Sunday 8 December 2013

DIY Nativity...

I've heard my husband tell the same story over and over of a childhood tradition he held very close to his heart growing up. I won't go into details, (mostly because I'll probably get the details wrong!), but in a nutshell, his Grandpa would read his brothers and cousins the Christmas story. Each child would get a 'character' from the story to place in the nativity scene. My husband always talked about how his youngest brother a   l   w   a   y   s got to be baby Jesus and how he had to be a Wiseman.

Needless to say, I realized how important it was for our growing family to have our own traditions. Enter my most favorite DIY project to date. I decided to make a nativity scene for our family, in hopes to carry the tradition that my husband spoke so fondly about.

I made my way to Michaels with little idea of what I was going to make the scene out of. I came upon some little wooden 'pieces' that I figured I could fashion into my Nativity characters. I also knew that I would be incorporating some of my own supplies like burlap, twine and paint.

Once I had all of my supplies, I made my way to my moms and raided her craft supplies. The crafting began. Thanks to her jewellery rejects and some old silk plants I was able to put finishing touches on all of the characters. (Check out the Wisemans' crowns and the angel's wings :)

I can't wait to read the Christmas Story on Christmas eve with our little girl this Christmas. I can only hope she'll speak so fondly of the tradition when she gets older.


Sunday 24 November 2013

DIY Advent Calendar!


This is one blog post I have been eager to write...and with December less than a week away, today seemed like the perfect day to share!

I have fond memories of counting down the days to Christmas through use of the highly sought after chocolate advent calendars. However, through my ever changing family unit, and thus ever changing family traditions, I have longed for a way to bring new tradition to the Christmas season. Enter the new and improved DIY Advent Calendar...sans chocolate.

The final project...I wonder what's in each envelope?


I started this project by 'washing' an old piece of douglas fir with red paint. ( I wanted the wood grain to show through so I just made a water and paint mixture that almost stained the wood).
 The douglas fir was picked up by my husband from a timber framing company he used to work for. It has, and will continue to come in very handy for this DIY family!

The project in it's early stages... was still working on the layout and envelope designs at this point!


I then began decorating each little envelope with a countdown day! I found the great little brown envelopes on Etsy  for about $20.00 including shipping. Although that seems expensive, this was my only expense for this project so I easily justified it!


I then made the activity inserts for each envelope. Some of the activities I included were, "have a no TV day", "bake cookies with the whole family" "go on a shopping trip for the food bank" and so on... I made those using good old and most importantly, cheap shipping tags from staples!

I had so much fun making this project and decided to send it to a friend instead of keep it for myself so I can't comment on it's success. I can however comment on the fact that a year later, I look at this picture and feel very proud of the project! So proud in fact that I might even tackle another one this year...only a bit different...stay tuned and cross your fingers I have the energy to create something new before that countdown to Christmas begins!

--As always, thanks for taking time to check out my blog :)

Monday 18 November 2013

Budget Update...

It's been about two weeks since my last 'budget' post and I'm sure you've been d y i n g to find out how everything is going!

We just completed Level 1 of the MyMoneyMyChoices program and already we are feeling so much more comfortable with our finances.

Some highlights of our budgeting 'workshop':

-created a spending analysis and dissected why we overspend when we do--how therapeutic!
-updated our debt repayment plan to suit our changing needs--(It has an end date and we are working with a very low interest rate! yahoo!)
-created a NetWorth statement...interesting exercise nonetheless--will be neat to watch it grow!
-earned our first level badge!


-started Level 2!
-we did this months ago but we have a very easy to follow budget calendar that made it easy to align our cash flow and bills

What's coming?
- we are going to start our spending journal...today

I can't really assume that everyone reading this blog has the same financial situation as us. But what I can assume is that if you've made it to the end of this blog post, then you're interest is probably peaked... Please send me a tweet or a facebook message if you are interested in more info--why not be financially literate? And for purely selfish reasons, I'll get bonus points for guiding someone through Level 1! ha ah

Oh and...minor celebration--Gail Vaz-Oxlade and I have been exchanging tweets! I feel so honored! (as long as she's not considering me one of her Money Morons!)

Happy Budgeting!

P.S. Christmas is coming which means DIY projects are on the rise! Stay tuned for a sneak peak at the advent calendar I made for a friend last year!

Sunday 3 November 2013

DIY Budget...here it goes

I'm going to apologize ahead of time for the subject of this blog post. "How to set yourself on the road to financial freedom". Wah wah.

What I will NOT apologize for is sharing a fantastic, new, hands on, user friendly, and most importantly, free, resource for how to set your finances straight.

I am a huge fan of Gail Vaz-Oxlade. She is the host of various budget 'helping' shows such as Til Debt Do Us Part, Princess, and Money Morons. I have been following her blog for years and with her help, my husband and I have learned how to spend cash only and create a monthly budget so we know exactly how much money we have to 'spend'.

The problem is, we seem to keep spinning our wheels and can't seem to get ahead. For whatever reason (maternity leave, emergencies--flood in particular etc etc).

Enter Gail Vaz-Oxlade. I can't even remember how it started. I think I responded to a tweet Gail sent out about people interested in gaining financial literacy. I have been receiving emails since regarding the launch of her new website/ financial literacy course.

On Friday we were sent the confirmation that the website had launched and we could begin our road to financial freedom! We quickly gathered what we needed to begin the program...

Six months of bank statements, an excel spreadsheet, and colored pens. We mean business. Working on earning our first 'stone'-- We've almost completed Activity 1!


I won't waste your time sharing details of the program--I'll let you check that out for yourself on your own time. Head on over to My Money, My Choices and see what my hype is all about.

For those who know me personally, feel free to send me a private message on Facebook to learn how to become part of our 'Tribe'.

Or, leave a comment below and I'll see how I can help :)

Happy Budgeting!!!

Friday 11 October 2013

DIY Fall Wreath...

I have totally fallen off the boat with posting to my blog over the last month (almost 2). Today I'll blame lack of money and a lengthy list of 'need's throughout the house.

But enough is enough. I was craving a DIY project today and with the help of Pinterest I knew just what I needed... A fall wreath!

I started by gathering ideas about what kind of wreath I wanted on our front porch.

Love the berries :)
Love the Burlap and the letter placement.


Enter coupons from Micheals--perfect timing no less.

I managed to pick up a grapevine wreath, two berry garlands and a monogram letter from Micheals--all for just over $20.00! Love those coupons!
 

A little twisting, tying and gluing and my masterpiece was complete..


I am SO happy with how my wreath turned out and even more happy that our front door now has a bit of character! True to Second Story Finishing's style, not everything on the wreath was purchased from Micheals today. That little burlap bow was made with what little burlap I had left from
my wedding ;)

On another note, I'll give credit where credit's due... Thanks to Lindsay for starting a blog and reminding me how much I love DIY sharing projects--check out her DIY tipi !


Tuesday 20 August 2013

When DIY and Organization collide...

Well it's been almost 2 weeks since we've moved into our new house and what a whirl wind!

I learned two lessons when it comes to 'doing' projects around the new house:

Lesson 1. Begin making a list immediately. Wander around the house with a clip board and create a list--it's totally inevitable that in each room, you will come across something that needs to be done. Instead of just doing it, write it down...then do it and cross it off your list! How productive you'll feel! Ha! (Maybe try a lanyard with a clipboard attached--that way it never leaves your side ;)

Lesson 2. Prioritize your list. I learned that moving can be a very overwhelming task--especially if you like to 'do' things to your house like paint, decorate, add personal touches etc. etc. Prioritizing that list in to whatever categories you see fit will be so helpful in tackling ALL of the tasks...For example, although I'd love to get started on creating a really funky powder room--the reality is that the use of that space is already totally functional--I'd just be adding lipstick. What wasn't totally functional made it to the top of my list of things to do.

Lucky for me, the item on the top of my list included a little DIY and a little organization.


I know it's barely visible but there's clutter to the left on the counter...and the calendar is in a sorry place. Not to mention there are papers just shoved in the file box on the counter.
 
 
The need for a command center became very apparent very quickly--in fact I even recall on moving day, looking at the pile of keys and documents on the kitchen counter closest to our back door--NOT OK!

And so began the collide of organizing and DIYing...

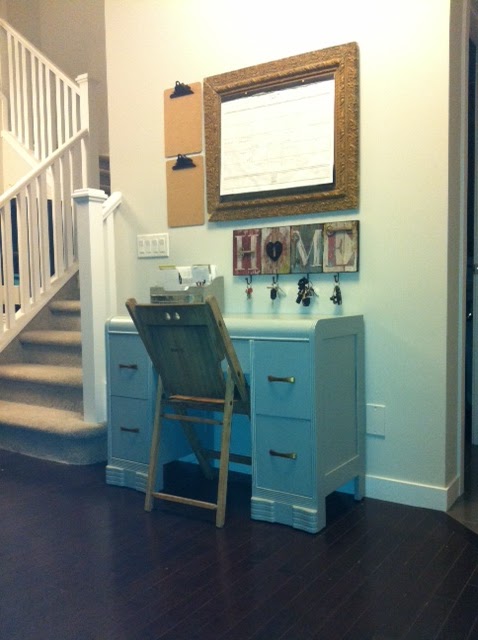
I actually started by just reflecting on what we needed in a command center. Here's what our family needed the most:

1. grocery list (clipboards were purchased at Dollarama. I just spray painted the chrome pieces with matte black spray paint to help make them a bit more rustic) 
 
2. spot for 'stuff' that needs attending
 
3. Our family calendar (This is on a bulletin board that my husband and I made from an old bulletin board that had a broken frame, and an old frame from a friends parents' garage sale in High River--before the flood! I orignally thought about painting  the frame but realized that the color of it matched the desk hardware perfectly--a match made in heaven!)
 
4. A drop spot for keys (hook plaque from Pier 1 Imports) 
 
5. A drop spot for change, and my husband's wallet  (tin that was originally used to house kitchen herbs. Purchased from chapters)
 
 
6.  and stuff that needs filing and a spot for notepads to make lists, meal plans, draw pictures, write love letters, keep score in a game of scrabble etc. etc.
 (bought this filing box from Winners!)


The desk, also mentioned in a previous post, belonged to my Grandma. I asked her about it's 'story' and she said, "Oh that old thing, we picked it up for nothing at a garage sale or something. We just needed something for the spare room. And it's not a desk. It's a vanity table." Bless her heart.

The chair was given to us by my mother-in-law and was also purchased at a garage sale!


Overall, I think I was successful in creating a Spencer Family Command Center! I would like to eventually paint the wall a bold color but for now, our family 'stuff' will continue to be dropped in a more organized fashion! Yahoo!
 
 
Thanks again for taking time to read my blog...Stay tuned for the next project!
--Jill


Thursday 8 August 2013

Here we go!!!


Today is the day! We are finally moving our belongings into our new home and I couldn't be more excited. It actually feels pretty surreal to know that we get to sleep in our own bed tonight, use our own coffee mugs and rediscover all of our treasures!

I am also SOOOOOOO excited to start DIY projects again. My husband asked me last night what my first project is going to be...I have so many to choose from! Bless his heart--instead of borrowing a drop cloth to keep furniture on the floor so we don't damage the hardwood, he bought one and said, "you'll need somewhere to put your projects when you're painting." It's the little things that count right?

Adding to our list of projects, we went to Nanton last weekend and took part in their Round Up Days celebration. We also spent time looking through the antique shops for something (we had no idea what) for our new home. One of the stores we loved was a new one to town called The Raven Store.

We came upon a HUGE mirror that was part of an art deco bedroom set. Someone had already purchased the set but left the mirror! Although we don't love the frame, the size of the mirror is perfect. (sorry we don't have pics--it's in storage--story of my life). I think we'll add some new trim to make it a bit more 'us'. More on that later.

Here's a little sneak a peak of the new house...Stay tuned for pics of all of our 'stuff' moved in!

Fireplace in the great room

HUGE kitchen...can't wait for all of the cabinetry!

Stairs--I took this pic more to see the color palate.
 
Eeep! Excitement is an understatement! Thanks for sticking by on our journey...I promise I'll get back to the premise of my blog once we've moved in!
 
--Jill


P.S. I'd like to make a mini shout out to my dear friend Jodi who has decided to start a blog called She Calls me Mommy. Her strength and courage continually amazes me and I LOVE that she is sharing her story...Love her to pieces. ;)